placeholder image

Sculpting Your Designs with the Eraser Tool in Adobe Illustrator

By: The Tip Team > Published: February 15, 2024

 TL;DR

Too long; Didn’t read

Learn how to use the Eraser Tool in Adobe Illustrator to sculpt and refine your designs. Learn techniques to remove unwanted elements and shape your artwork with precision for more dynamic and creative results.


What’s the Tip?

Adobe Illustrator’s Eraser Tool is an incredibly flexible feature, perfect for designers who enjoy the tactile feel of erasing parts of their work to create new shapes or clean up their designs. Unlike a physical eraser, Illustrator’s Eraser Tool provides precision and control, making it an essential part of the creative toolkit. Here’s how to make the most of it.


Getting Started with the Eraser Tool:

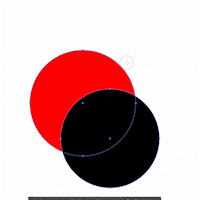
The Eraser Tool (shortcut: Shift + E) can be found in the Illustrator toolbar. It allows you to remove parts of your artwork in a freeform manner, acting on paths and filled areas alike. It’s particularly useful for refining shapes, creating custom illustrations, and adding artistic touches to your work.


Using the Eraser Tool:

  1. Select the Eraser Tool: Click on the Eraser Tool icon or press Shift + E to activate it.
  2. Adjust Tool Options: Double-click the Eraser Tool icon to open its options dialog box. Here, you can adjust the eraser’s size, angle, and roundness to fit your specific needs.
  3. Start Erasing: Simply drag the tool across the areas you wish to erase. For more precision, use a graphics tablet. The Eraser Tool works by subtracting the area it passes over, cutting through paths and shapes.
  4. Modify Your Artwork: Use the Eraser Tool to add creative touches, like texture or pattern within your shapes, or to subtract parts of your design for a minimalist look.


Creative Applications:

  • Texturing: Add texture to your illustrations by erasing parts of solid fills or strokes, creating a more dynamic and interesting visual effect.
  • Custom Shapes: Quickly modify existing shapes into new, unique designs by selectively erasing parts of them.
  • Refinement: Clean up excess or unwanted elements in your design with precision, enhancing the overall look and feel of your artwork.


Tips for Success:

  • Layer Use: Apply the Eraser Tool on individual layers to avoid accidentally erasing unintended parts of your design. Lock layers you’re not working on for added safety.
  • Combine with Other Tools: Use the Eraser Tool in conjunction with the Pathfinder Tool for complex shape manipulations and to create intricate designs with ease.


Conclusion:

The Eraser Tool in Adobe Illustrator is a powerful feature that offers designers the flexibility to modify and refine their artwork with ease. Whether you’re creating intricate illustrations, designing logos, or simply experimenting with new shapes and textures, the Eraser Tool can help bring your creative vision to life. Dive in and discover the endless possibilities this tool offers to enhance your Illustrator projects.

Leave a Reply

Your email address will not be published. Required fields are marked *

Recent Posts

  • 3 Simple Steps to Create a REALISTIC Shadow in Illustrator
    Learn how to create realistic shadows in Adobe Illustrator in just 3 simple steps! In this video, I’ll walk you through creating the shadow shape, adjusting its perspective, and fading it for a natural look. This quick and easy tutorial is perfect for designers looking to add depth and realism to their illustrations. […]
  • Text to Image to 3D – THIS IS NEXT-LEVEL!
    I tried this new tool on Krea.ai that transforms text into images and then into stunning 3D models, all while letting you interact with them in real-time!. […]
  • Transform Shapes into Realistic 3D with Illustrator & Firefly
    Want to turn your flat Illustrator shapes into stunning 3D designs? In this video, I’ll show you how to combine Adobe Illustrator with Firefly to create realistic 3D effects in just a few clicks. […]
  • The Easiest Way to Duplicate Effects in Illustrator
    Want to copy and paste effects in Adobe Illustrator effortlessly? In this video, I’ll show you a simple trick to transfer effects between objects in seconds. […]
  • Simple Font Trick Makes AMAZING Logos Fast
    Logos don’t need to be complicated, In this video, I’ll show you how to create a professional logo in Adobe Illustrator starting with a bold font. You’ll learn how to apply gradients for depth and reflections for a polished look—all in just a few steps. Perfect for beginners or anyone looking to improve their logo design skills. […]
  • Warping Text in ADOBE ILLUSTRATOR Made Easy!
    Ever wonder how designers create warped text effects for banners, logos, and posters? In this tutorial, I’ll show you how to use the **Envelope Distort** tool in Adobe Illustrator. You’ll learn how to warp text using **Make with Top Object**, plus I’ll introduce two other options—**Make with Warp** and **Make with Mesh**. These tools have been a designer’s secret weapon for years, and I’ll teach you how to use them step-by-step. Whether you’re a beginner or advanced user, this video will unlock new creative possibilities for your designs. […]
Custom HTML here.
Privacy Policy